




Disclaimer: This article is for general informational purposes only and does not replace official guidance from park staff or safety authorities. Always check the National Park Service for current conditions, closures, and regulations, and use your best judgment for weather, terrain, and personal health.
Introduction — The $50 Reality Check
The fastest way to enjoy a park day without turning it into a survival exercise is to start with a national park packing list budget plan that prioritizes comfort, safety, and weather reality not “perfect gear.”
This guide is written for USA visitors who want a reliable, repeatable system that works for a quick scenic stop, a few miles on trail, or a full day of exploring without dropping a bunch of money.
Field note (real mistake, real lesson): I once showed up to a windy overlook in the late afternoon with “nice weather” clothes, a single small bottle of water, and a phone at 18%.
The temperature dropped fast, the wind cut through my shirt, and my map app stopped loading right when I needed it. Nothing dramatic happened but the day shifted from “wow” to “I need to leave.” The fix wasn’t expensive. It was a smarter, smaller set of basics.
This article assumes the reader already owns everyday essentials (a phone, casual clothes, and comfortable walking shoes).
The goal is to fill the gaps that most first-timers miss especially the high-impact items that prevent common problems like dehydration, sunburn, dead batteries, and blisters. It also leans on beginner hiking gear you can buy locally, because most people don’t want a specialty shopping trip just to visit a park once.
How this guide stays under $50 without feeling “cheap”
The strategy is “buy once, use everywhere.” Instead of chasing niche gadgets, the reader focuses on items that solve multiple issues at the same time: hydration, sun/bug protection, navigation, and basic safety.
The approach is also designed around failure points the moments that derail a day: surprise rain, heat exposure, sore feet, or losing service. Most importantly, it shows how to avoid overpacking for short hikes by packing for probable discomforts rather than imaginary emergencies.
National Park Packing List Budget — The Under-$50 Framework
A realistic budget system starts with a simple truth: not every dollar buys the same amount of comfort and safety. The best use of a limited spend is to target “trip-ending” risks first, then add convenience items only if money remains.
The 4 priorities that should never be compromised
- Water + sun protection: When hydration and sun exposure go wrong, the day ends early.
- Weather layer: Many parks swing from warm to cold quickly, especially near water or at elevation.
- Navigation + power: Phones fail at the exact moment service drops or batteries drain.
- Basic first aid + emergency signaling: Small problems (blisters, minor cuts, getting turned around) are what usually ruin a day.
Field note: My own “non-negotiables” were learned the annoying way sunburned shoulders after a cloudy morning, a phone that died before the return hike, and a blister that turned a scenic walk into a limping exit.
What can be skipped (and why) on most day trips
Many visitors buy too much too soon: heavy tools, trendy accessories, or “just in case” equipment that never gets used. The better move is a frugal day-hike checklist built around what actually changes outcomes: hydration, weather readiness, foot comfort, and an emergency baseline.
Plan Before You Pack (Tools That Save Money)
Planning is the cheapest gear upgrade available. A few minutes of prep often prevents unnecessary purchases and reduces the chances of arriving unprepared.
Check park rules, hours, and conditions
The most credible starting point is the National Park Service site for the specific park: hours, closures, trail alerts, wildlife notices, and any required rules (food storage, seasonal restrictions, etc.). If the visit involves reserved entry, timed tickets, or permits, Recreation.gov is often the correct place to confirm what is required.
A practical habit is to screenshot key information (entry instructions, emergency numbers, and trail notes) before leaving town. That also supports a checklist for visiting a visitor center: confirm current ranger advice, ask about water availability, verify trail conditions, and pick up a paper map if the park offers one.
Weather and terrain research
For weather, use NOAA Weather for forecasts and alerts rather than relying on a single generic app. For terrain context, USGS Topo Maps helps the reader understand elevation gain, ridgelines, and drainage areas where conditions can change quickly. A quick rule: if wind, rain, or a big temperature swing is likely, the packing plan must include a true layer system and a “keep electronics dry” strategy.
The Under-$50 Core Packing List (Day Visit + Short Trails)
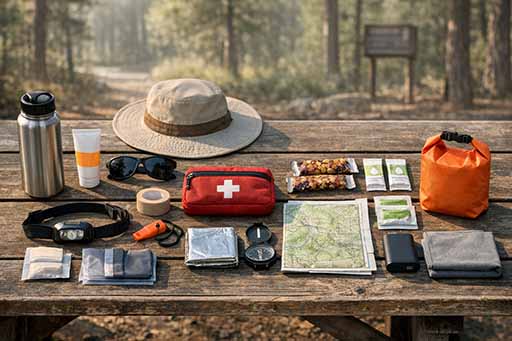
This section is the practical core: category-by-category essentials with “why it matters,” plus substitutions that keep costs down. The goal is a kit that feels light, simple, and consistent.
Clothing system (light, flexible, re-wearable)
The backbone of affordable hiking essentials is a flexible outfit that handles heat, shade, wind, and a surprise drizzle. A lightweight layering system does more than keep the body comfortable it prevents fatigue and bad decisions late in the day.
- A moisture-wicking base layer helps in heat and humidity by drying faster and reducing that “sticky” feeling.
- Quick-dry hiking pants (or similar quick-dry fabric) reduce chafing and stay comfortable if the trail is damp.
- A packable rain jacket is not only for rain; it also blocks wind at exposed overlooks.
Field note: Cotton is comfortable until it isn’t. On humid trails it holds sweat; on windy ridges it turns into a cold sponge. Quick-dry fabrics feel less dramatic until the day changes, and then they feel like the best decision.
This clothing approach also makes it easier to understand how to layer clothes for changing temperatures: start slightly cool, add or remove one layer at a time, and never wait until shivering begins.
If footwear is already owned, that’s enough. Many visitors show up in trail-friendly everyday shoes from brands like Merrell or KEEN and do perfectly fine on maintained paths.
Foot comfort without fancy upgrades
Foot issues are the number one reason casual visitors cut a day short. The most useful small item is blister prevention tape, because it prevents hot spots from becoming a problem.
High-ROI comfort upgrades are often socks and insoles:
- Superfeet insoles (or any supportive insole) can reduce fatigue on long walking days.
- Darn Tough Vermont socks (or any quality hiking sock) help with moisture control and friction.
A simple practice covers how to prevent blisters in new boots: break footwear in gradually, use friction-reducing socks, and tape hot spots at the first sign of rubbing.
Sun + bugs (the cheapest way to avoid a miserable day)
Heat, glare, and insects are “quiet” problems that build until the day stops being fun. The baseline is simple:
- A sun hat for trails protects the face and scalp.
- Polarized sunglasses for hiking reduce glare and eye strain (especially near water and sand).
- Broad-spectrum sunscreen prevents burns even on partly cloudy days.
- Insect repellent wipes are easy to apply without leaking in a bag.
Some visitors prefer a known product such as Ben’s Insect Repellent; what matters most is using something consistently in buggy zones, especially near water, tall grass, or forest edges.
Field note: Sunscreen is not a “morning-only” item. In my experience, reapplication matters most when the day includes reflective surfaces (water, sand, granite) or higher elevation.
Water + hydration (do this right and everything feels easier)
Hydration is the foundation of energy, mood, and safety. The minimalist setup begins with a reusable water bottle and a plan to refill whenever possible. If the park has uncertain water access or the visitor might hike longer than expected water purification tablets provide a low-cost backup. For hot days, electrolyte drink packets help replace what sweat removes.
Optional examples of containers and hydration systems include Nalgene, Hydro Flask, and CamelBak, but the best option is the one the reader will actually carry and use.
This section answers cheapest way to stay hydrated on trails: carry more than seems necessary, sip consistently, and avoid waiting until thirst appears. It also supports how to filter water from streams safely by clarifying expectations: tablets treat water but take time; filters are faster but cost more. Always follow product instructions and local guidance, and avoid treating obviously contaminated water sources.
Food + snacks that survive the car and the trail
Food on a park day should be simple, stable, and satisfying. The goal is steady energy, not a gourmet picnic. A reliable approach is:
- Trail snacks for long hikes (salty + sweet + protein) to prevent energy crashes.
- Picnic lunch packing that can handle a warm car and still taste good.
- Stove-free meal ideas for visitors who don’t want cooking gear.
This also answers easy lunch ideas that won’t melt in the car: wraps, nuts, shelf-stable tuna packets, hearty fruit, crackers, and a small cooler if already owned.
Wildlife considerations
Food must be managed responsibly. Wildlife-safe food storage matters even for short visits, especially in areas with bold animals. The practical answer to how to store snacks safely around wildlife is to keep food sealed, never leave it unattended, and follow posted guidance.
Wildlife encounters should remain respectful: keep distance, never feed animals, and avoid creating habits that harm them.
Navigation + phone reliability
Many visitors assume a phone is enough, until it isn’t. A simple setup includes:
- A printed trail map (picked up at the park or printed ahead).
- A compass for beginners for basic orientation when trails intersect.
- Offline navigation on phone downloaded before leaving service.
- A portable power bank to prevent the “dead phone” scenario.
A common, reliable option for battery packs is Anker, but any reputable battery with enough capacity for one or two phone charges is useful. For planning and route previews, AllTrails can be convenient especially when users download maps in advance. For a fun education layer, iNaturalist can help identify plants and animals responsibly.
This also addresses ways to keep phone battery alive outdoors: reduce screen brightness, switch to airplane mode when service is poor, keep the phone warm in cold weather, and use offline maps.
Field note: In cold or windy conditions, battery life drops faster than most people expect. The best time to protect the battery is before it starts dying.
Safety + basic first aid
“Safety gear” does not need to be bulky. It needs to be useful. A compact setup includes:
- A compact first-aid pouch for small issues that happen often.
- A headlamp with extra batteries for late returns, shaded trails, or sunrise starts.
- An emergency whistle for signaling if separated or disoriented.
- A space blanket for emergencies for sudden cold, wind, or unexpected delays.
- A pocket knife or multitool for minor fixes (gear, food packaging, small repairs).
Examples of reputable outdoor brands include Black Diamond Equipment and MSR (Mountain Safety Research), but the key is function, not status. This section also highlights quick emergency items for day hikes: a light source, signal tool, basic first aid, and an insulation backup.
What belongs inside the author’s own pouch:
- blister care + bandages
- antiseptic wipes
- a small roll of tape
- pain relief (if appropriate)
- a few safety pins
Hygiene + comfort
A small comfort kit keeps the day cleaner and easier:
- A microfiber camp towel for sweat, mist, or quick cleanup.
- Campground shower sandals if the trip includes public facilities.
This also supports a simple hygiene kit for campgrounds: hand sanitizer, small wipes, and a dedicated bag so these items don’t float loose in the pack.
Organization + pack protection
The goal is speed and order so the reader isn’t digging through everything in the parking lot. Three low-cost solutions do most of the work:
- Zip-top bags for organizing (separate first aid, snacks, and hygiene).
- A dry bag for electronics to protect phone and power in wet areas.
- A reusable trash bag for cleanup so wrappers and waste never become litter.
This is also the best way to carry trash out responsibly: one dedicated bag that stays accessible, closes tightly, and leaves with the visitor every time.
Field note: The trash bag matters more than people think. It prevents the “I’ll carry this for now” wrapper that later blows out of a pocket at a windy overlook.
Where to Buy Everything Cheap in the USA (Without Regret)
The smartest budget approach is to shop like a pragmatist: start with what is already owned, then fill gaps using local, reliable sources. This keeps the focus on low-cost outdoor gear without wasting money on “specialty” labels.
Budget sourcing order (thrift → big box → outdoor stores)
A practical sourcing ladder looks like this:
- Thrift or “already owned” items (layers, hats, simple bags)
- Big-box basics: Walmart, Target, Costco, Academy Sports + Outdoors
- Outdoor retailers for specific upgrades or sales: REI Co-op, Backcountry
This approach avoids the trap of buying everything “new” for one trip. It also keeps purchases realistic and quick: most people can find a usable layer, sunscreen, and snack supplies locally in a single stop.
Budget backpacks: what matters more than brand
Backpacks are where many beginners overspend. The truth is that fit and organization matter more than labels. Some readers may already own packs from Osprey or Deuter, but a simple day pack can work if it fits well and carries water comfortably.
A useful checklist:
- straps don’t dig into shoulders
- pack sits close to the back (no swinging)
- enough space for layers + food + water
- one quick-access pocket for essentials
This also clarifies how to build a minimalist day pack: pack only what prevents discomfort and solves the top risks, then stop.
Customize Your List by Environment (USA Regions)
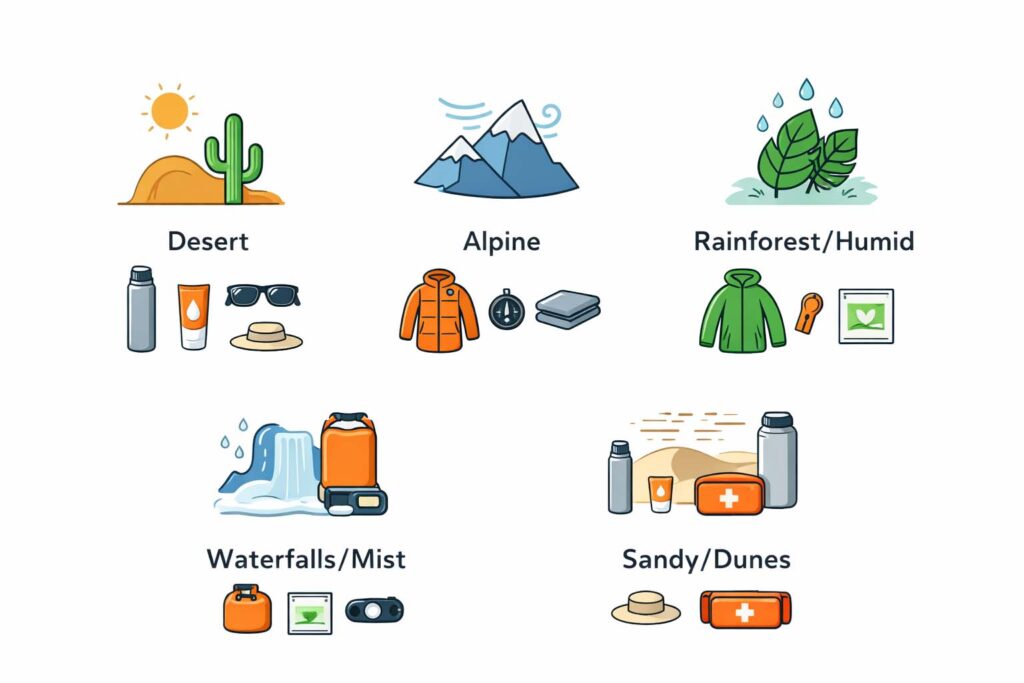
Parks differ more than people expect. The best budget list is flexible: it stays small, but adds two to four environment-specific items.
Desert parks (Southwest)
Deserts are unforgiving because shade is limited and dehydration sneaks up. In these conditions, the visitor should prioritize water capacity, electrolytes, and strict sun protection. This is where must-haves for desert heat and sun exposure becomes real: more water than seems necessary, consistent sunscreen, and timed breaks in shade whenever possible.
Alpine + high elevation parks (Rockies, Sierra)
High elevation adds wind and fast weather shifts. The key is insulation plus wind/rain protection even when the morning feels mild. This covers what to bring for alpine wind and chill: a real layer plan, a wind-blocking outer layer, and a backup warmth option in case the return hike takes longer than expected.
Rainforests + humid trails (Pacific Northwest, Appalachia pockets)
Humidity changes everything: sweat doesn’t evaporate as quickly, and damp gear becomes uncomfortable fast. The best packing list for rainforests and humid trails emphasizes quick-dry clothing, friction control for feet, and reliable protection for electronics.
Waterfalls + mist + damp gear
Mist can soak clothes and electronics without warning. This answers what to bring for waterfall mist and damp gear: reliable electronics protection, a quick-dry towel, and footwear awareness (wet rocks are slippery).
Sandy trails + dunes (Great Lakes, coastal areas)
Sand increases friction and turns short walks into slow effort. This covers what to bring for sandy trails and dunes: eye protection, a routine to empty shoes, and a plan to avoid overheating in reflective sun.
Micro-Itineraries (So Readers Can Copy/Paste Plans)
These quick templates help visitors pack for the day they actually have planned without overbuying.
Sunrise hike mini-pack
For early starts, visibility and warmth matter. This answers what to pack for a sunrise hike: light source, warm layer, snacks, and a reliable map. A sunrise kit is often the same as a day kit just with a headlamp and a little more warmth.
Scenic overlooks road trip day
Road-trip days still need basics, because the most beautiful overlooks often include short walks in exposed areas. This covers essentials for a road trip to scenic overlooks and things to pack for scenic drive pullouts: water, snacks, sun protection, a trash bag, and offline directions so the day doesn’t derail in a dead-zone.
Family day on a tight spend
Families benefit from the same system just with higher snack volume and stronger comfort planning. This addresses family-friendly trail gear on a tight spend and items to keep kids comfortable on hikes: frequent water breaks, simple snacks, and layers that adjust as kids warm up or cool down quickly.
Smart Packing Technique (Less Bulk, More Readiness)
Most people don’t need more gear they need better packing logic.
Packing order that prevents “digging chaos”
This is how to pack a small backpack efficiently:
- bottom: emergency layer, first aid, and backup warmth
- middle: food and extra water
- top: rain layer and quick-access items
- side pocket: water bottle
- outside pocket: sunscreen, bug wipes, and map
Field note: The “top pocket” is where days are saved. If sunscreen or snacks are buried, they tend to be skipped until it’s too late.
Two quick fixes used when weather flips
This section covers quick fixes for unexpected rain on the trail:
- put the rain layer on early (before soaked)
- protect electronics immediately, then reassess route and timing
A small adjustment early prevents big discomfort later.
Ethics and Park-Respect (Short, Strong, Credible)
Budget travel and responsible travel go well together because the best behaviors cost nothing.
Leave No Trace basics that cost $0
The Leave No Trace Center for Outdoor Ethics teaches a clear baseline: stay on durable surfaces, respect wildlife, and pack out everything. Visitors should treat parks like shared public spaces because they are.
Passes, parking, and avoiding surprise fees
For frequent visitors, the America the Beautiful Pass can be cost-effective. For parking and access planning, budget-friendly parking apps can reduce last-minute stress especially in popular areas where lots fill quickly.
Under-$50 Budget Build Examples (3 Tiers)
These examples keep spending realistic. Prices vary by location, so the focus is on “swap logic” rather than exact totals.
Tier A — “Owned basics, needs a few upgrades”
This tier assumes a visitor already has decent shoes, casual layers, and a backpack. Add only what changes outcomes:
- sun protection and hydration support
- a small first-aid setup
- power backup
A practical add-on for stability is exploring low-cost alternatives to expensive trekking poles such as using a sturdy stick where permitted, slowing pace on descents, and focusing on footwear support rather than buying extra gear.
Tier B — “Some basics, needs a complete day kit”
This tier is for visitors who have casual clothing but lack core day-hike items. Prioritize:
- water capacity + electrolytes
- sun + bug protection
- light source + emergency basics
- map + backup power
Tier C — “Starting from scratch”
This tier is the strictest budget. It focuses on the “day-saving” list first: water, sunscreen, snacks, basic first aid, and navigation. If the trip includes an overnight car stay, add a simple car-camping starter kit using what is already owned (blanket, simple light, basic hygiene), and avoid purchasing heavy equipment for one outing.
If wildlife viewing is a goal, use an inexpensive binoculars alternative such as careful phone zoom from a respectful distance rather than walking closer. Distance is safer for both people and animals.
10 FAQs
Each answer includes a direct response, a reason, a personal practice note, and a common mistake.
1) Can someone visit a US national park with under $50 of new gear?
Yes if they already own basics and spend only on high-impact items (water capacity, sun protection, a simple safety baseline).
Why: Most costs come from unnecessary “nice-to-have” upgrades.
Field note: The author’s best under-$50 days happened when the plan was simple and the kit was consistent.
Common mistake: Buying one expensive item and skipping sunscreen, hydration support, or a backup power solution.
2) What is the single most important item for short trails?
Water capacity is usually the top priority.
Why: Even short walks feel harder when dehydrated.
Field note: The author now treats water like a “ticket” item no water, no trail.
Common mistake: assuming a short distance means low risk, especially in sun or wind.
3) Is a filter required, or are tablets enough?
Tablets can be enough for backup, but filters are faster and often more convenient. Examples of common filters include Sawyer Products and LifeStraw.
Why: Treatment method should match the situation, time, and water availability.
Field note: The author uses tablets as an emergency option and relies on planned water whenever possible.
Common mistake: treating questionable water without understanding the product’s instructions and timing.
4) How should visitors prepare for dead zones?
The simplest answer to how to plan for limited cell service is to download maps before the trip, carry a paper backup, and screenshot key park info.
Why: Many parks have spotty service in valleys, canyons, and remote areas.
Field note: The author assumes service will fail and plans accordingly.
Common mistake: relying on live navigation and then getting turned around when the phone stops updating.
5) What changes in shoulder season?
The best packing tips for shoulder-season trips are to add one true warm layer and treat wind/rain as more likely than expected.
Why: Spring and fall often swing from warm sun to cold shade quickly.
Field note: The author packs for the coldest hour of the day, not the warmest.
Common mistake: dressing for the parking lot temperature only.
6) How can people stay warm overnight without bulky gear?
For car-based nights, how to stay warm at night without bulky gear often comes down to dry layers, a warm hat, and a simple insulation strategy using what is already owned.
Why: Staying dry and blocking drafts matters more than owning specialized equipment.
Field note: The author learned that a dry base layer and wind control beat “more stuff.”
Common mistake: wearing damp clothes into the evening and expecting a blanket to fix it.
7) What is the best minimalist day pack setup for beginners?
A small pack with water, snacks, sun protection, a weather layer, and safety basics is enough for most popular routes.
Why: Minimalism increases follow-through and reduces decision fatigue.
Field note: The author packs the same “core kit” every time and adapts only for environment.
Common mistake: packing “maybe items” that bury essentials.
8) What should visitors pack for parks with sand or dunes?
Eye protection, extra water, and a shoe clean-out routine matter most.
Why: Sand increases effort, glare, and friction.
Field note: The author treats sand days like sun days more water, more breaks, less hurry.
Common mistake: pushing the same pace as on firm trails.
9) How should trash and food smells be handled in wildlife areas?
Seal food, keep it attended, and pack out all waste immediately.
Why: Food habits change animal behavior and increase risk for everyone.
Field note: The author keeps trash contained from the first wrapper, not the last.
Common mistake: leaving food or trash in open bags “just for a minute.”
10) What should visitors do first when they arrive?
Check official guidance, confirm conditions, and collect a map if available.
Why: Local updates are often different from what was planned at home.
Field note: The author builds five minutes into arrival for ranger updates.
Common mistake: walking straight to the trailhead without confirming closures or water conditions.
Conclusion — The 60-Second Re-Pack Checklist
A budget-friendly park day works best when the list stays consistent. The visitor should repack the same core categories every time: hydration, sun/bugs, a weather layer, navigation and power, basic safety, and responsible cleanup. When those basics are covered, the rest of the day becomes simpler less “what if,” more “enjoy the view.”
Field note: The author’s current packing routine takes about a minute because the kit lives in one place. It’s the same system for a quick overlook, a long day of walking, or a last-minute weekend plan just with small environment tweaks.
Author Bio
Author Bio: Silvia Heart writes practical, budget-friendly outdoor guides for everyday travelers exploring the USA. Published by Ahmed Saeed.